サンプルアプリケーション
今まではRailsアプリケーションのデザインを独学でCSS書いたりjQueryプラグイン入れたりしてたのですが、今更ながらboootstrapを利用しようと思い始めました。
Ruby on Rails でBootstrap3をインストールする手順を纏めておきます。
今回はRailsアプリケーションのプロジェクト名としてbootstrap3_sampleという文字を使用することにします。
また、ここで使用しているRailsバージョンはRails 4.1.6です。
1
2
3
$ cd /path/to/rails_app
$ bundle exec rails -v
Rails 4.1.6
作成したアプリケーションはheroku にpushしますのでRailsのデータベースドライバとしてPostgreSQLを選択します。それに併せてPostgreSQLのインストールや設定についても自分への備忘録として残しておきます。
Bootstrapを使用するまで
PostgreSQLの準備
PostgreSQLインストール
PostgreSQLの公式yumレポジトリからインストールします。
1
2
yum install -y http://yum.postgresql.org/9.3/redhat/rhel-6-x86_64/pgdg-redhat93-9.3-1.noarch.rpm
yum install -y postgresql93-server postgresql93-contrib postgresql93-devel
PostgreSQLインストール直後のデータベースディレクトリである/var/lib/pgsql/9.3/dataを削除してデータベースを初期化(initdb)し、postgresql-9.3サービスを起動します。ついでに、自動起動も設定します。
1
2
3
4
rm -rf /var/lib/pgsql/9.3/data
service postgresql-9.3 initdb
service postgresql-9.3 start
chkconfig postgresql-9.3 on
PostgreSQLの認証方式をPeerからTrustへ変更
https://www.postgresql.jp/document/9.3/html/auth-methods.html
PostgreSQLではデフォルトの認証方式としてPeer認証が設定されています。Peer認証とは、カーネルからクライアント上のシステムユーザ名を取得し、PostgreSQLデータベースユーザと同一である場合のみ接続が許可される仕組みです。PostgreSQLでは、デフォルトではpostgresデータベースユーザしか存在しないため、UnixユーザもPostgreSQLをパッケージインストールすると作成されているpostgresである必要があります(su - postgresしないとダメということ)。
Peer認証だとUnixのスーパーユーザであるrootであってもpostgresデータベースユーザへの接続は許可されません。
1
2
3
4
5
# id
uid = 0( root) gid = 0( root) 所属グループ= 0( root)
# psql --username=postgres
psql: FATAL: ユーザ "postgres" で対向( peer) 認証に失敗しました
今回は、サーバに接続できる全Unixユーザから全データベースユーザへの接続が許可されるTrust認証に変更します 。
Peer認証からTrust認証への変更は/var/lib/pgsql/9.3/data/pg_hba.confを修正します。
/var/lib/pgsql/9.3/data/pg_hba.conf 1
2
#local all all peer
local all all trust
設定ファイルを修正したのでpostgresql-9.3サービスを再起動します。
1
service postgresql-9.3 restart
Railsアプリケーション用のデータベースユーザを作成
PostgreSQL 9.3ではCREATE USERはCREATE ROLEの別名になりました。 唯一の違いは、CREATE USERという名前でコマンドが呼び出されると、デフォルトでLOGINになり、CREATE ROLEという名前でコマンドが呼び出されると、デフォルトでNOLOGINとなる点です。
https://www.postgresql.jp/document/9.3/html/sql-createuser.html
postgresデータベースユーザで接続します。
1
psql --username= postgres
今回作成するRailsアプリケーションのプロジェクト名と同一のbootstrap3_sampleというデータベースユーザを作成し、データベース作成権限とログイン権限を持つように設定します。
1
create user bootstrap3_sample with createdb password 'bootstrap3_sample' ;
上記SQLは以下コマンドと同じ効果があります
1
createuser --username= postgres --createdb bootstrap3_sample -P
createuserコマンドはpostgresql93(末尾の数字はバージョン番号なので適宜目置換を!)RPMパッケージに付属しているPostgreSQLのデータベースユーザ(正確にはロール)を作成するためのコマンドです。SQLでのユーザ作成とは異なり、コマンドでパスワード文字列を指定することは出来ず、-Pオプションによってパスワード文字列を指定するプロンプトが表示されます。
データベースユーザのパスワードがシステムカタログ上に保存される際に暗号化するかどうかはENCRYPTED/UNENCRYPTEDで明示するか、そうでない場合は、/var/lib/pgsql/9.3/data/postgresql.confのpassword_encryption設定パラメータに依ります。password_encryption設定パラメータがonの場合に暗号化が有効(default: on)です。
先述した通り、create userSQLはログイン権限オプション(login)を明示しなくても有効となりますし、createuserコマンドでもログイン権限オプション(–login)がデフォルトで有効なので、ここでは指定していません。この辺りのSQLやコマンドの挙動はPostgreSQLバージョンにも依ると思うので自信の無い場合はログイン権限オプションを明示した方がいいかもしれません。
Railsプロジェクトの作成
新しいRailsプロジェクトを作成します。
1
2
3
rails new bootstrap3_sample --database= postgresql
cd bootstrap3_sample
bundle exec spring stop
データベース接続情報を設定
config/database.yml 1
2
3
4
5
6
7
8
9
10
11
12
13
14
15
16
17
18
19
20
21
22
default : &default
adapter : postgresql
encoding : unicode
pool : 5
development :
<< : *default
database : bootstrap3_sample_development
user : bootstrap3_sample
password : bootstrap3_sample
test :
<< : *default
database : bootstrap3_sample_test
user : bootstrap3_sample
password : bootstrap3_sample
production :
<< : *default
database : bootstrap3_sample_production
username : bootstrap3_sample
password : <%= ENV['BOOTSTRAP3_SAMPLE_DATABASE_PASSWORD'] %>
Gemライブラリのインストール
Rails4でBootstrap3をインストールする簡単な方法はGemライブラリを使用することです。
今回はTwitter社公式のbootstrap-sass を使用します。
比較はしていませんが、anjlab-bootstrap-rails などもあり、anjlab/anjlab-widgets が使えることなどが特徴のようです。こちらのGemはbootstrap-sass との併用は推奨されていないようです。
Gemfileに追記します。therubyracerはアンコメントすれば有効になります。
Gemfile 1
2
3
4
5
6
7
8
9
10
11
# See https://github.com/sstephenson/execjs#readme for more supported runtimes
gem 'therubyracer' , platforms : :ruby
# Install Twitter Bootstrap3
# https://github.com/twbs/bootstrap-sass
gem 'bootstrap-sass' , '~> 3.2.0'
# -webkit-border-radius みたいなブラウザベンダープレフィックスをよしなに管理してくれる
# Parse CSS and add vendor prefixes to rules by Can I Use
# https://twitter.com/autoprefixer
gem 'autoprefixer-rails'
Railsプロジェクト作成時のGemfileと比較するとこのようになります。
1
2
3
4
5
6
7
8
9
10
11
12
13
14
15
16
17
18
19
20
21
22
23
--- a/Gemfile
+++ b/Gemfile
@@ -12,7 +12,7 @@ gem 'uglifier', '>= 1.3.0'
 # Use CoffeeScript for .js.coffee assets and views
 gem 'coffee-rails', '~> 4.0.0'
 # See https://github.com/sstephenson/execjs#readme for more supported runtimes
-# gem 'therubyracer',  platforms: :ruby
+gem 'therubyracer',  platforms: :ruby

 # Use jquery as the JavaScript library
 gem 'jquery-rails'
@@ -38,3 +38,11 @@ gem 'spring',        group: :development
 # Use debugger
 # gem 'debugger', group: [:development, :test]

+# Install Twitter Bootstrap3
+# https://github.com/twbs/bootstrap-sass
+gem 'bootstrap-sass', '~> 3.2.0'
+
+# -webkit-border-radius みたいなブラウザベンダープレフィックスをよしなに管理してくれる
+# Parse CSS and add vendor prefixes to rules by Can I Use
+# https://twitter.com/autoprefixer
+gem 'autoprefixer-rails'
Gemライブラリをインストールします。
bootstrap-sassを使用する準備
今回はSassというプリプロセッサに対応したbootstrap3をインストールしているのですが、CSSの//= require行はSassでは文法として使用できない ので注意が必要です。そして、Sass拡張子のファイルやその他のスタイルシートであっても、Bootstrapからmixinsや変数を利用できないので//= require行は利用できない ということです。
本家GiHubのREADME に従い、app/assets/stylesheets/application.cssは削除します。
1
rm app/assets/stylesheets/application.css
app/assets/stylesheets/application.css.scssを新規作成します。
app/assets/stylesheets/application.css.scss 1
2
@import "bootstrap-sprockets" ;
@import "bootstrap" ;
app/assets/javascripts/application.jsにBootstrap関連のJavascriptsライブラリをrequireします。
app/assets/javascripts/application.js 1
//= require bootstrap-sprockets
app/views/layouts/application.html.erbのheadタグにbootstrap関連のスタイルシートをincludeする設定とメディアクエリーを使用するためのviewport設定 を追記します。
app/views/layouts/application.html.erb headタグ内の記述 1
2
< %= stylesheet_link_tag "bootstrap", media: "all", "data-turbolinks-track" => true %>
<meta content= "width=device-width, initial-scale=1" name= "viewport" >
scaffoldで骨組みを生成
scaffoldを実行します。
1
2
3
bundle exec rails g scaffold Entry name:string description:string
bundle exec rake db:create
bundle exec rake db:migrate
root_pathの設定
scaffoldで生成されたentriesリソースのindexをroot_pathに設定します。
config/routes.rb
ここでブレイク
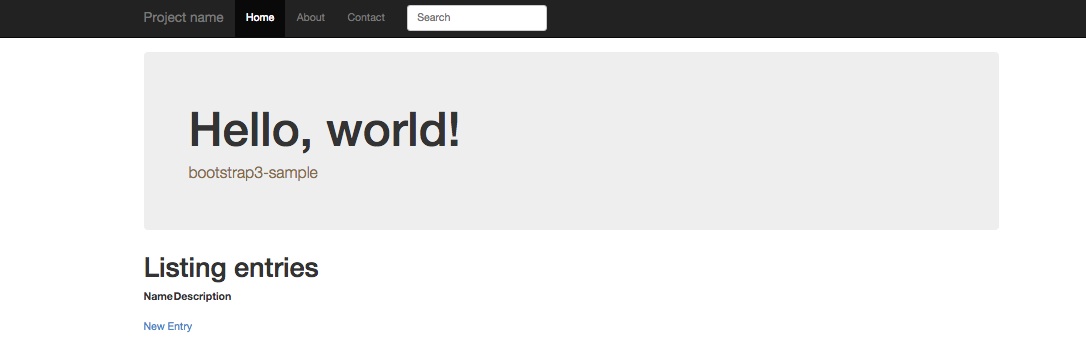
この段階でrails serverコマンドを実行してWEBrickを起動すると以下のような画面が表示されます。
ここからBootstrapを使っていきます
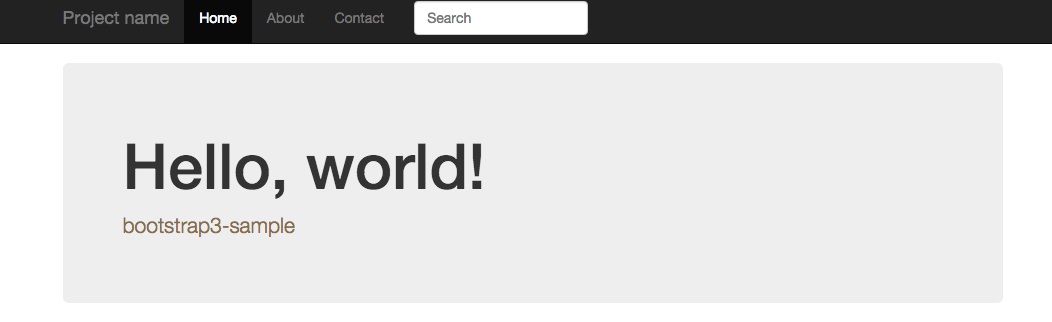
ナビゲーションメニュー
bodyタグの上部にナビゲーションメニューを設置してみます。
application.html.erb 1
2
3
4
5
6
7
8
9
10
11
12
13
14
15
16
17
18
19
20
21
22
23
<div class= "navbar navbar-inverse navbar-fixed-top" role= "navigation" >
<div class= "container" >
<div class= "navbar-header" >
<button type= "button" class= "navbar-toggle" data-toggle= "collapse" data-target= ".navbar-collapse" >
<span class= "sr-only" > Toggle navigation</span>
<span class= "icon-bar" ></span>
<span class= "icon-bar" ></span>
<span class= "icon-bar" ></span>
</button>
<a class= "navbar-brand" href= "/" > Project name</a>
</div>
<div class= "collapse navbar-collapse" >
<ul class= "nav navbar-nav" >
<li class= "active" ><a href= "/" > Home</a></li>
<li><a href= "#about" > About</a></li>
<li><a href= "#contact" > Contact</a></li>
</ul>
<form class= "navbar-form navbar-left" >
<input type= "text" class= "form-control col-lg-8" placeholder= "Search" >
</form>
</div> <!--/.nav-collapse -->
</div> <!-- /.container -->
</div> <!-- /.navbar -->
Jumbotron(ジャンボトロン)
Jumbotron(ジャンボトロン)と呼ばれるページトップなどに表示する見出しユニットをbodyタグの上部、ナビゲーションメニューの下あたりに設置してみます。
まず、app/assets/stylesheets/theme-style.css.scssを作成し、スタイルを追加します。
app/assets/stylesheets/theme-style.css.scss 1
2
3
4
5
6
7
8
9
10
11
12
13
14
15
16
17
18
body {
padding-top : 70 px ;
padding-bottom : 30 px ;
}
.theme-dropdown .dropdown-menu {
position : static ;
display : block ;
margin-bottom : 20 px ;
}
.theme-showcase > p > .btn {
margin : 5 px 0 ;
}
.theme-showcase .navbar .container {
width : auto ;
}
app/assets/stylesheets/application.css.scssに作成したtheme-style.css.scssを読む込むように設定します。
app/assets/stylesheets/application.css.scss 次にJumbotron(ジャンボトロン)を表示するためのコードを記述します。
app/views/layouts/application.html.erb 1
2
3
4
5
6
7
8
9
10
<div class= "container theme-showcase" role= "main" >
<!-- Main jumbotron -->
<div class= "jumbotron" >
<h1> Hello, world!</h1>
<p class= "text-warning" > bootstrap3-sample</p>
</div> <!-- /.jumbotron -->
< %= yield %>
</div> <!-- /.container -->
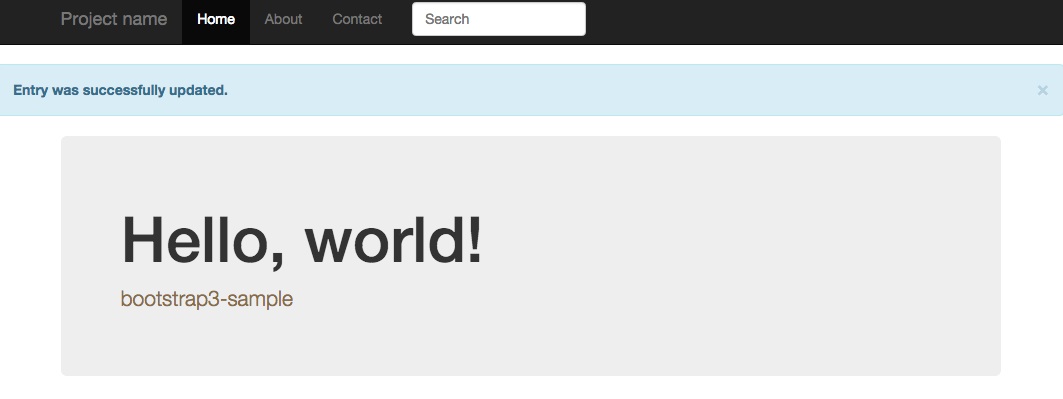
Railsのフラッシュメッセージ表示
後述するapp/views/entries/show.html.erbに<%= notice %>というフラッシュメッセージを表示するコードがscaffoldによって自動生成されているのですが、Bootstrap3のAlertsコンポーネントを使って見栄えを良くすると同時に、先述したJumbotron(ジャンボトロン)の上部に表示するためにapp/views/layouts/application.html.erbに移動しlます。
app/views/layouts/application.html.erb 1
2
3
4
5
6
7
8
9
<% if ( notice ) %> <div class="alert alert-info alert-dismissible" role="alert">
<button type="button" class="close" data-dismiss="alert">
<span aria-hidden="true">×</span>
<span class="sr-only">閉じる</span>
</button>
<strong> <%= notice %> </strong>
</div>
<% end %>
entriesリソースのビューファイルを修正
scaffoldで生成したビューファイルに色々とBootstrap3のスタイルを適用していきます。
app/views/entries/index.html.erb
app/views/entries/index.html.erb 1
2
3
4
5
6
7
8
9
10
11
12
13
14
15
16
17
18
19
20
21
22
23
24
25
26
27
28
<h1> Listing entries</h1>
<button type= "button" class= "btn btn-lg btn-default" >
< %= link_to 'New Entry', new_entry_path %>
</button>
<br>
<div class= "col-md-6" >
<table class= "table table-striped" >
<thead>
<tr>
<th> Name</th>
<th> Descriptiion</th>
<th colspan= "3" ></th>
</tr>
</thead>
<tbody>
< % @entries.each do |entry| %>
<tr>
<td> < %= entry.name %></td>
<td> < %= entry.description %></td>
<td> < %= link_to 'Show', entry %></td>
<td> < %= link_to 'Edit', edit_entry_path(entry) %></td>
<td> < %= link_to 'Destroy', entry, method: :delete, data: { confirm: 'Are you sure?' } %></td>
</tr>
< % end %>
</tbody>
</table>
</div>
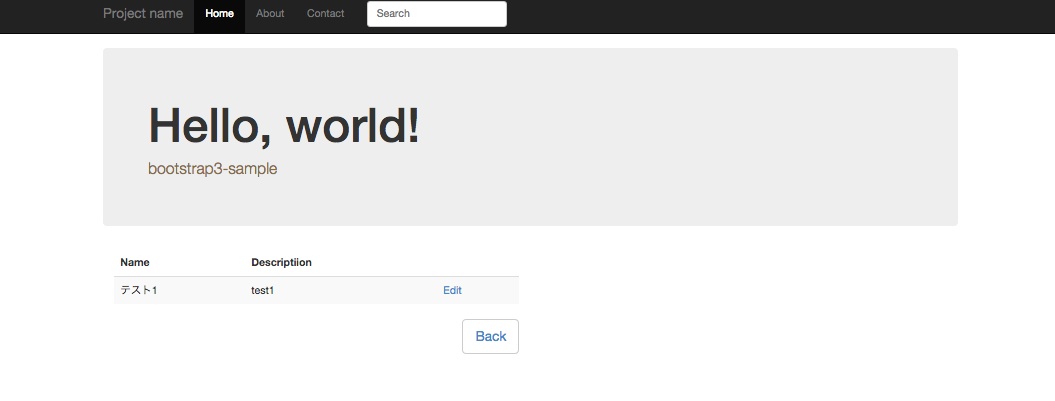
app/views/entries/show.html.erb
app/views/entries/show.html.erb 1
2
3
4
5
6
7
8
9
10
11
12
13
14
15
16
17
18
19
20
21
22
23
<div class= "col-md-6" >
<table class= "table table-striped" >
<thead>
<tr>
<th> Name</th>
<th> Descriptiion</th>
<th></th>
</tr>
</thead>
<tbody>
<tr>
<td> < %= @entry.name %></td>
<td> < %= @entry.description %></td>
<td> < %= link_to 'Edit', edit_entry_path(@entry) %></td>
</tr>
</tbody>
</table>
<button type= "button" class= "btn pull-right btn-lg btn-default" >
< %= link_to 'Back', entries_path %>
</button>
</div>
app/views/entries/new.html.erb
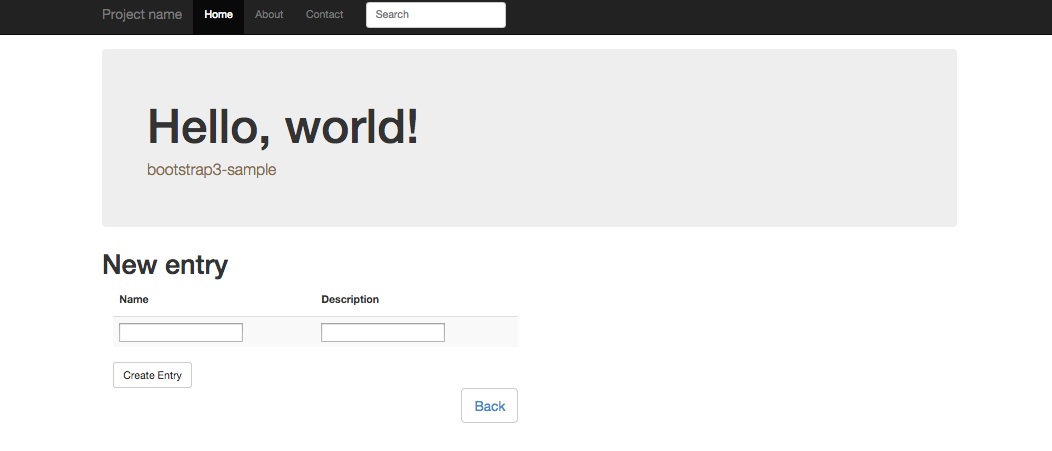
app/views/entries/new.html.erb 1
2
3
4
5
6
7
8
9
10
<h1> New entry</h1>
<div class= "col-md-6" >
< %= render 'form' %>
<button type= "button" class= "btn pull-right btn-lg btn-default" >
< %= link_to 'Back', entries_path %>
</button>
</div>
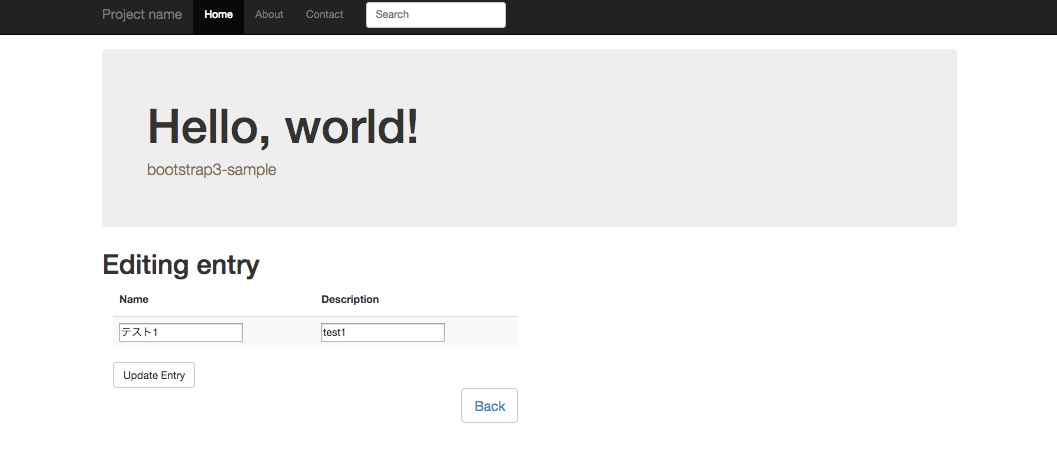
app/views/entries/edit.html.erb
app/views/entries/edit.html.erb 1
2
3
4
5
6
7
8
9
10
<h1> Editing entry</h1>
<div class= "col-md-6" >
< %= render 'form' %>
<button type= "button" class= "btn pull-right btn-lg btn-default" >
< %= link_to 'Back', entries_path %>
</button>
</div>
app/views/entries/_form.html.erb
app/views/entries/_form.html.erb 1
2
3
4
5
6
7
8
9
10
11
12
13
14
15
16
17
18
19
20
21
22
23
24
25
26
27
28
29
30
31
< %= form_for( (@entry), {:role => "form"} ) do |f| %>
< % if @entry.errors.any? %>
<div id= "error_explanation" >
<h2> < %= pluralize(@entry.errors.count, "error") %> prohibited this entry from being saved:</h2>
<ul>
< % @entry.errors.full_messages.each do |message| %>
<li> < %= message %></li>
< % end %>
</ul>
</div>
< % end %>
<table class= "table table-striped" >
<thead>
<tr>
<th> < %= f.label :name %></th>
<th> < %= f.label :description %></th>
</tr>
</thead>
<tbody>
<tr>
<td> < %= f.text_field :name %></td>
<td> < %= f.text_field :description %></td>
</tr>
</tbody>
</table>
< %= f.submit :class => "btn btn-default" %>
< % end %>
herokuにpushしてみる
https://devcenter.heroku.com/articles/getting-started-with-rails4
Herokuを使う準備
production環境でのアセットコンパイルを有効にする
config/environments/production.rbを修正してproduction環境でのassetsを有効にします。
以下の設定パラメータを設定します。
config/environments/production.rb 1
2
3
4
config . cache_classes = true
config . serve_static_assets = true
config . assets . compile = true
config . assets . digest = true
修正後のconfig/environments/production.rbのdiff情報です。
config/environments/production.rb 1
2
3
4
5
6
7
8
9
10
11
12
13
14
15
16
17
18
19
--- a/config/environments/production.rb
+++ b/config/environments/production.rb
@@ -20,14 +20,14 @@ Rails.application.configure do
# config.action_dispatch.rack_cache = true
# Disable Rails's static asset server (Apache or nginx will already do this).
- config.serve_static_assets = false
+ config.serve_static_assets = true
# Compress JavaScripts and CSS.
config.assets.js_compressor = :uglifier
# config.assets.css_compressor = :sass
# Do not fallback to assets pipeline if a precompiled asset is missed.
- config.assets.compile = false
+ config.assets.compile = true
# Generate digests for assets URLs.
config.assets.digest = true
gitレポジトリを作成
herokuに対するアプリケーションのデプロイ方法はgit pushを行うことなので、ローカル環境でgitレポジトリを作成します。
1
2
3
4
cd /path/to/app
git init .
git add ./
git commit -m "initial commit"
herokuにアカウントを登録
こちらからherokuにアカウントを登録する
heroku toolbelt インストール
heroku toolbelt とは、heroku appsの作成や管理を行うためのHerokuクライアントで、実体はherokuコマンドファイル です。
herokuコマンドをインストールする方法は、OSプラットフォームにより3パターンあります。
Mac OSX 、またはWindows ではパッケージが提供されていますのでパッケージをダウンロードしてインストールします。Debian/Ubuntu にもdeb形式のパッケージが公開されていますが、こちらは直接ダウンロードするのではなくインストールスクリプト を利用します。Debian/Ubuntu以外のUnix/Linux ではxzファイルフォーマットで圧縮されたtarボールで配布されています。こちらもインストールスクリプト を利用します。
CentOS6なので3番目のインストールスクリプト を利用します。https://toolbelt.heroku.com/standalone の内容に沿ってインストールします。
注意点としては、インストールスクリプト の実行はsudo権限を持つユーザである必要があります(中でsudoを実行しているため)。
1
wget -qO- https://toolbelt.heroku.com/install.sh | sh
これで/usr/local/heroku/bin以下にherokuコマンドがインストールされるので、$PATH環境変数に/usr/local/heroku/binへのパスを設定しておきます。
1
echo 'export PATH=${PATH}:/usr/local/heroku/bin' >> ~/.bashrc
heroku toolbelt を使ってherokuへログイン
herokuコマンドラインツールを使ってログインします。先ほど作成したherokuアカウントのメールアドレスとパスワードを入力し、Authentication successful.と表示されればログイン成功です。また、該当Unixユーザでのログインが初めての場合は公開鍵認証に関する設定を行う場合があります。
heroku appsを作成
今回はbuf-material-bootstrap3-sampleという名前のアプリケーションをheroku上に作成します。
1
heroku apps:create buf-material-bootstrap3-sample
コマンドの結果が以下のように表示されます。
URLがhttp://buf-material-bootstrap3-sample.herokuapp.com/ で、heroku上に作成されるgitレポジトリのURLがgit@heroku.com:buf-material-bootstrap3-sample.git となりました。
heroku apps:create buf-material-bootstrap3-sample コマンド結果 1
2
3
Creating buf-material-bootstrap3-sample... done, stack is cedar
http://buf-material-bootstrap3-sample.herokuapp.com/ | git@heroku.com:buf-material-bootstrap3-sample.git
Git remote heroku added
heroku appsにアプリケーションをデプロイ & DBマイグレーション
herokuへのアプリケーションデプロイはなんとgit push heroku master1発なのです!
DBマイグレーションをお忘れなく。
1
2
git push heroku master
heroku run rake db:migrate
これで http://buf-material-bootstrap3-sample.herokuapp.com/ にアクセスすると先ほどローカル環境で見ていたアプリケーション画面が表示されました。
サンプルアプリケーション